Little did I know when I posted the coconut thread, that I would soon dive head first into the world of coconut.
A little coconut research will yield endless amounts of natural remedies, skin care, hair care, weight loss advice, etc. It's the new super-drug!
What is my personal experience with coconut products? Well, I use pure coconut oil on my hair for instance. I have curly, dry hair that tends to be really frizzy, and it's thin. Like really thin. So, I need deep conditioning when I style. I blow dry my hair and straighten almost daily. Coconut oil applied specifically at the tips helps my hair look healthy when straight.
I don't buy conditioner any more. I use coconut oil. After I shampoo (haven't found out about making coconut shampoo yet, but I will!), I apply just a small amount (less than 1/8 teaspoon). I put it all over my hair, while wet in the shower. The last thing I do before I leave the shower is rinse my hair well. Then sometimes I apply more, even less than I did in the shower, and dry/style as usual. It's worked wonders and I don't have to spend all that money on various products that will do the same thing.
I don't buy lotion any more, either. I've always hated the feel of it on my hands. A bit, around a teaspoon worth, works great on your legs, arms, face, anywhere you apply lotion regularly. I rub it on my face twice a day, before makeup in the morning and after cleaning at night. This may sound silly, but I've noticed a significant reduction in acne since starting this. Right now, I've been doing this for a month and no significant facial blemishes.
I made deodorant with it. Seriously. For about $1 total, you can make your own deodorant that's as good as the clinical strength types you buy for almost $10. My next post will detail the process.
You can use it to make your own toothpaste. That post will come soon as well, as I haven't yet done it but read many successful stories.
AND, you can cook with it. I keep a separate jar in the kitchen and bathroom, obviously. Anywhere you use butter, you can substitute coconut oil.
What's the advantage of doing this? Coconut oil has no cholesterol! Also, it is the only, ONLY plant-based source of OMEGA-3s. It is a significant source of MCFAs (medium chain fatty acid) specifically lauric acid. Lauric acid benefits can be read here
I've found that the cheapest place to purchase coconut oil is online at Amazon.com. You can research which brands you like, but I buy Nutiva mainly because of the cost savings. Also, if buying on Amazon and using the "Subscribe and Save" option you can save even more, pay no shipping or taxes, depending on your state.
Let me know if you've tried this or are going to. What are you experiences with coconut oil?

(hōm'grōn') adj. Raised or grown at home. (rī'ət) n. A disturbance of the peace by three or more persons assembled for a common purpose.
Friday, September 2, 2011
MIA
I've been missing for a couple months now. Some of you may be wondering about my garden.
Well, I'm in Texas and if you haven't heard, we almost broke records with the 100+ heat. While it rained recently, we've had no measurable rainfall since May.
While I was gone on vacation, for 2 1/2 weeks, the garden suffered from high heat and wind. The friction caused by wind created a burning effect on the surface. Along with the hot soil and unrelenting sun, my garden had no chance. Really, none of the gardens in the area did well, nor has the large farms fared well.
So, until I can plant cold-weather crops, I will sustain from gardening advice and stick to other home topics. I will still highlight recipes and the occasional rant, I'm sure.
Please don't forget about the page. I appreciate all views.
Thursday, July 21, 2011
French Bread

The next bread I'm featuring is a recipe for French Bread.
A good French baguette will have a very crispy crust and chewy center, as well as long and thin in shape.
The French are known for their baking prowess and I have to admit I was very skeptical that I could bake and "edible" loaf. Surprisingly, it's quite simple. The biggest difference I found in preparing this versus other breads that I'm comfortable (like Challah), is that you have to roll the dough, jelly roll style, before it's second rise.
The recipe I used can be found here:

Flour (all purpose) and yeast in bowl of my stand mixer.

Honey I added.

At this point in the recipe I decided the dough needed more kneading. It was kneady! lol

A smooth, elastic dough.

Add about 1 tablespoon of oil to a bowl so that your dough won't stick to it.

A well kneaded, smooth dough.
After taking the dough out of the mixing bowl, I decided that it was still too sticky. I added flour, 1 tablespoon at a time, while kneading by hand to get the right consistency.
Your dough should be soft but not stick to your hands. This takes practice and experience to know how it should "feel." The recipe won't always be exact. The amounts of fluids and flour will depend on your brand of flour. Some flours soak up liquids while others don't.

Remember the bowl with the oil? I did a little dough gymnastics to get the ball covered with oil. Just plop your ball o' dough into the bowl on top of your drop of oil and flip it over. I turn it a couple times to ensure the dough is covered with oil. Believe me, this step is important!

Rolled dough into a rectangle-ish shape. I'm geometrically challenged here. :)

The rolling of the dough.

When you've rolled this much use your fingers or a pastry brush dipped in water and brush the loose end. Then finish rolling and seal.

Lay baguette (with ends folded/pinched under) on your baking sheet of choice. Grease the sheet. I forgot to do this. :)

Brush with egg wash.

Cut 4-5 diagonal slits in the top.
Unfortunately I have no more pictures. The ol' brain blipped and I forgot to take pics of the finished product.
I'd be fairly accurate in saying it looked like this:

Here's the full recipe with my adjustments:
Ingredients
6 cups all-purpose flour
2 1/2 (.25 ounce) packages active dry yeast
1 1/2 tablespoons salt
2 cups warm water (120 degrees F/45 degrees C)
1 tablespoon butter, melted
1 tablespoon honey
1 egg white
1 tablespoon water
Directions
In a large bowl, combine 2 cups flour, yeast and salt. Stir in 2 cups warm water, butter and honey and beat until well blended using a stand mixer with a dough hook attachment. Using a wooden spoon, stir in as much of the remaining flour as you can.
On a lightly floured surface, knead in enough flour to make a stiff dough that is smooth and elastic. Knead for about 8 to 10 minutes total. Shape into a ball. Place dough in a greased bowl, and turn once. Cover, and let rise in a warm place until doubled.
Punch dough down, and divide in half. Turn out onto a lightly floured surface. Cover, and let rest for 10 minutes. Roll each half into large rectangle. Roll up, starting from a long side.
Moisten edge with water and seal. Taper ends.
Grease a large baking sheet. Sprinkle with cornmeal. Place loaves, seam side down, on the prepared baking sheet. Lightly beat the egg white with 1 tablespoon of water, and brush on.
Cover with a damp cloth. Let rise until nearly doubled, 35 to 40 minutes.
With a very sharp knife, make 3 or 4 diagonal cuts about 1/4 inch deep across top of each loaf.
Bake in a preheated 375 degrees F (190 degrees C) oven for 20 minutes. Brush again with egg white mixture. Bake for an additional 15 to 20 minutes, or until bread tests done. If necessary, cover loosely with foil to prevent over browning. Remove from baking sheet, and cool on a wire rack.
Thursday, July 7, 2011
Soy!!
I love edamame and often use it to make hummus.
Just now after commenting on a related topic on facebook I was presented with information about the dangers of women consuming high levels of soy-based products.
Just a quick google search uncovered several pages of independent research on the topic and the health risks involved with a soy-centric diet.
If you consume lots of soy or give your infant soy-based formula then I implore you to read for yourself.
Dangers of soy
hiatus
I've been on vacation for a few weeks. While I've got lots of great topics to post, I just haven't been in the spirit to do so! LOL
So, my dear friend and fellow blogger Farah Evers offers up a great recipe and some culture as a guest writer.
Enjoy!

Lebanese Sahlab
Lebanese Sahlab is something of a cross between pudding and a very thick milkshake. You can drink it warm or eat it cool with a spoon. The texture and thickness all depends on how long you cook it, how much cornstarch you prefer and if you cool it in the fridge. If you’re eating it like a dessert you can sprinkle crushed pistachio nuts on top. YUM!
Sahlab is usually preferred during winter, but I love it year round. I used to drink it during the month of Ramadan. Think of it like eggnog in Christmas, minus the egg.
The key ingredients for that special Lebanese taste are Orange Blossom water and cinnamon. Some versions contain Rose Water and others just use vanilla. Actually you can use any flavoring you want, even chocolate! But if you want the authentic one go for Orange Blossom water.
Sahlab is available in ready to use powder form where you can just add warm milk to it. This is an example package. They come in individual sachets or even bulk sachets.

But I know it’s not the easiest thing to come across if you don’t live in the Middle East, so here’s a recipe I learned from my mom. It’s not as authentic but it’s pretty close.
Recipe
Serves 4
Ingredients:
4 cups of milk
½ cup of cornstarch (You can adjust this depending on the thickness you want)
3 tablespoons of sugar
2 tablespoons of Orange Blossom water or Rose water (Optional)
Sprinkle of cinnamon or crushed pistachios
Method:
1. Mix the Sahlab powder or cornstarch with a few tablespoons of cold milk and set aside.
2. Bring the remaining milk to a boil.
3. Pour in the starch mixture, stirring constantly. (It can get lumpy so make sure you keep stirring)
4. Cook over very low heat, stirring continuously, until the milk thickens.
5. Add in the sugar and the rose water or orange blossom water.
6. Remove from heat and pour into cups.
7. Finish it off with a sprinkle of cinnamon.
If you’re making it as a dessert to eat, pour into bowls and finish off with pistachios& cinnamon.
If you’re drinking it warm, go for the cinnamon.
Enjoy!
So, my dear friend and fellow blogger Farah Evers offers up a great recipe and some culture as a guest writer.
Enjoy!
Lebanese Sahlab
Lebanese Sahlab is something of a cross between pudding and a very thick milkshake. You can drink it warm or eat it cool with a spoon. The texture and thickness all depends on how long you cook it, how much cornstarch you prefer and if you cool it in the fridge. If you’re eating it like a dessert you can sprinkle crushed pistachio nuts on top. YUM!
Sahlab is usually preferred during winter, but I love it year round. I used to drink it during the month of Ramadan. Think of it like eggnog in Christmas, minus the egg.
The key ingredients for that special Lebanese taste are Orange Blossom water and cinnamon. Some versions contain Rose Water and others just use vanilla. Actually you can use any flavoring you want, even chocolate! But if you want the authentic one go for Orange Blossom water.
Sahlab is available in ready to use powder form where you can just add warm milk to it. This is an example package. They come in individual sachets or even bulk sachets.
But I know it’s not the easiest thing to come across if you don’t live in the Middle East, so here’s a recipe I learned from my mom. It’s not as authentic but it’s pretty close.
Recipe
Serves 4
Ingredients:
4 cups of milk
½ cup of cornstarch (You can adjust this depending on the thickness you want)
3 tablespoons of sugar
2 tablespoons of Orange Blossom water or Rose water (Optional)
Sprinkle of cinnamon or crushed pistachios
Method:
1. Mix the Sahlab powder or cornstarch with a few tablespoons of cold milk and set aside.
2. Bring the remaining milk to a boil.
3. Pour in the starch mixture, stirring constantly. (It can get lumpy so make sure you keep stirring)
4. Cook over very low heat, stirring continuously, until the milk thickens.
5. Add in the sugar and the rose water or orange blossom water.
6. Remove from heat and pour into cups.
7. Finish it off with a sprinkle of cinnamon.
If you’re making it as a dessert to eat, pour into bowls and finish off with pistachios& cinnamon.
If you’re drinking it warm, go for the cinnamon.
Enjoy!
Tuesday, May 31, 2011
Veggie Knowledge...

"Intelligence is knowing a tomato is a fruit,
Wisdom is knowing not to put it in a fruit salad"
Thursday, May 26, 2011
Harvesting...

The garden has come quite a long way!
Here was my harvest today:

Included here is: 3 Roma tomatoes, crookneck squash, a strawberry (lol), a tomatillo (lol), a LOT of Arugula, dill, and a bit of cilantro.
I have several more tomatoes ripening (turning red).

If you're wondering about the newspaper under the tomato in the picture, from a previous post my tomatoes had "early blight" and rather than spraying fungicide I removed the diseased leaves/stems and spread newspaper for mulch. It worked very well and my plants are thriving again. I continue to remove blighted leaves when I see them.
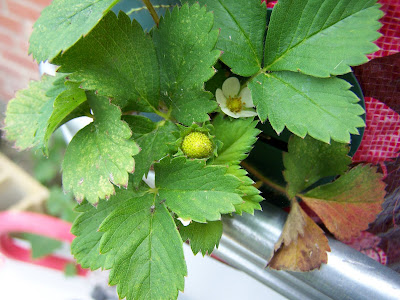
My lone strawberry grew to maturity.

It's common for first-year strawberry plants to not produce many berries. But I hope that I get a few more off these plants. They are showing signs of more berries coming.
This...

I call the mutant berry. Not quite sure what it's gonna be. It looks half-formed. I may pick it just so the plant can put it's energy into making more berries. We'll see.
And if you recall, I had a few plants that I suspected came from somewhere else. They kept coming up despite my pulling them. I hadn't planted them, this year at least. Well, I left one out of curiosity. And lo' and behold...

It was a tomato plant! Kenny (my husband) thinks it was from tomatoes I planted last year and let lay on the soil. That makes sense. I'm glad I left them now. There are at least 10 such plants growing. This one is the only one producing fruit at the moment.
And back to tomatoes:


I wish I could add those little white arrows to the pics to point to each tomato. I will likely have at least 200 tomatoes by the end of the growing season, barring any unforeseen craziness. Many of the plants now have around 10 tomatoes each. Not counting those wayward plants that came from who knows where. Eek!
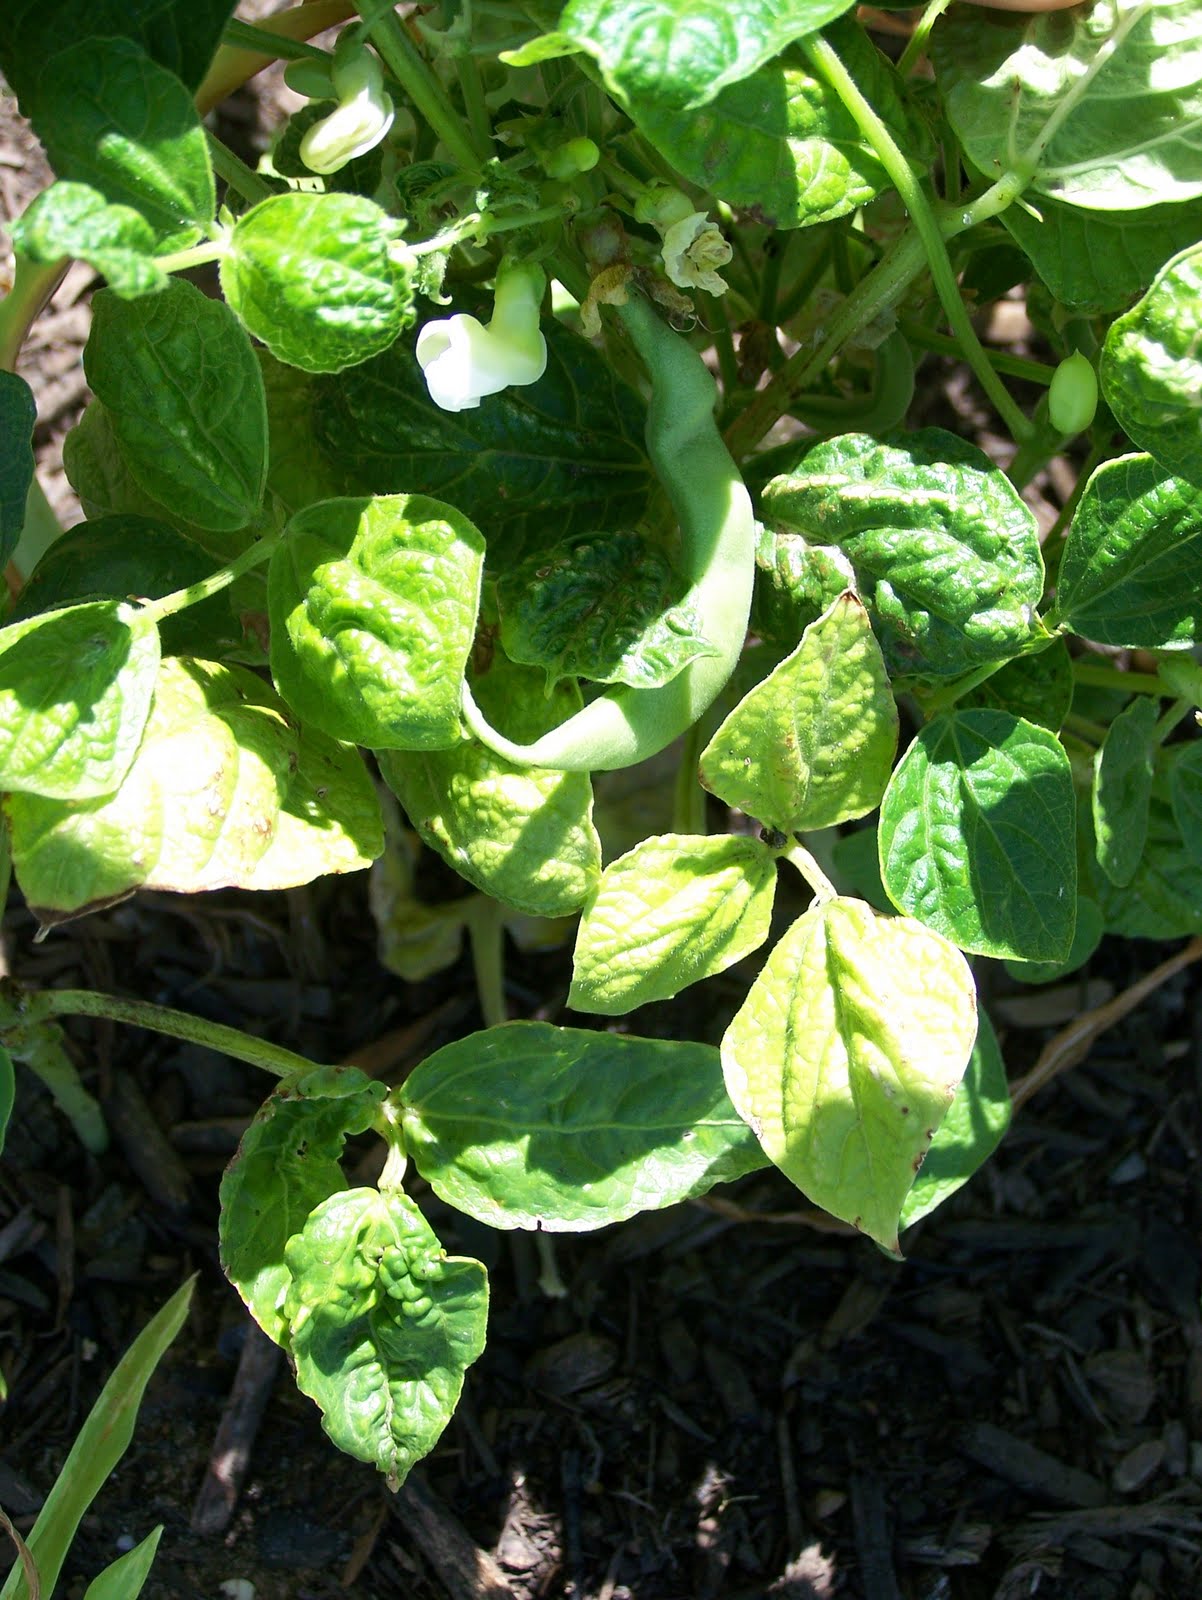
And so far this is the only bean I have. *sigh* I don't know what I'm doing wrong with my beans and peas. I will research and work on it.
Likewise my corn has tassled, yet again, at under 4 feet tall. This is why I didn't want to mess with it this year. But hubs insisted. Men! Oh well, from what I've read I should still get corn with proper pollination. Of which I just saw several bees buzzing around my squash plants.
Never been so happy to see bees. :)
Wednesday, May 11, 2011
Strawberries!
At request from a friend, here are pics of a few "baby" berries, lol!

They're the size of the tip of your pinky (sp?) finger! Cute!!


They're the size of the tip of your pinky (sp?) finger! Cute!!
Arugula Pesticide Success Photos
Comparison Photos from arugula organic pesticide. The growth in 6 days was quite impressive once the bugs left it alone.
Before:

See all the holes?
Now after the hot pepper/garlic/oil concoction of last week:

Obviously, I still have bugginess, but it's not as prevalent as it was before and I haven't reapplied since last Thursday (it's now Wednesday). If I wanted them completely off the plants I would apply every other day until they got the hint, lol.
My point here is, and my ecstasy over the results stem from, the plants were unable to grow because the bugs were eating them up. The pepper mix inhibited the bugs enough that the arugula was at least able to thrive enough to grow. I'm happy and have found out that if I'm diligent with making such things I can in fact keep the bugs off the plants.
Another, less "flavorful" solution to keep bugs off your plants is to spray them with soapy water. We used to do this in Illinois to keep Japanese beetles off our plants. They would fly and land on our flowers and eat them up. This way, they would just slide right off. And, no spicy side effects. ;)
Squash anyone?
Squash is the no-brainer plant. Anybody can grow it. But WOW. When these fruits mature what am I to do with it all?????


Squash matures quickly. If you pick it today, you'll need to check other plants tomorrow. The can go from not quite ready to too mature in just 2 days. Believe me, I've picked a TON of squash in my lifetime and this is one thing I know. ;)


Squash matures quickly. If you pick it today, you'll need to check other plants tomorrow. The can go from not quite ready to too mature in just 2 days. Believe me, I've picked a TON of squash in my lifetime and this is one thing I know. ;)
Sickness :(
My tomatoes are sick :(


The leaves at the base of the plants are yellow and spotted meaning they are suffering from "early blight." This is a fungus that is found in the soil and splashes onto leaves when plants are watered or rained on. We have had substantial amounts of rain in the last week and I wasn't surprised to see the disease present itself.
Roma tomatoes are surprisingly disease resistant and typically only suffer from this problem.
So my predicament: how do I "organically" remedy the situation? Aggressive gardeners would buy a fungicide and kill the blight. After a little research I discover I can clip the affected leaves and add some mulch, protecting the healthy leaves from further damage.
Even though it took quite a bit of time, I did pull all the leaves off that were yellow and spotted. I was surprised to see that they were dying and weak, easily giving away from the plant.
I have a newspaper that I was going to throw in my compost barrel but I will use it to mulch around the tomatoes since we are expecting more rain and I don't want to spread the blight again.
Hopefully my plants will continue to thrive despite this issue.
Monday, May 9, 2011
Organic Pesticide--Easier to Make Than You May Think! (pics will post later)
Last week I posted pics of my garden. As you may have noticed, my arugula looked pitiful. The bugs seemed especially attracted to it for some reason. I was loathe to use commercial pesticides since they are notorious for killing all bugs, both bothersome and beneficial to plant's ecosystems.
Since I was making several salsas for Cinco de Mayo, I was privy to the seeds and membranes of several hot pepper varieties. I wasn't using anything overly aggressive, just standard jalapeños, serranos, and poblanos. But to keep from killing all the taste buds of the party goers mouths I reserved most of the hottest components from the peppers from the salsas.
I have read over the years that most pests will avoid anything overly fragrant or spicy/hot, much like the human. Kinda funny, huh? They want what we want. With this in mind I decided to use the membranes and seeds from all my peppers to make a pesticide for my ailing arugula.
What I did:
I pureed all the parts of the peppers I'd saved. I threw in about 4 cloves of fresh garlic (I didn't bother peeling it.) I also added in some dried hot red chiles, about 6 whole. All into the blender it went with a little water and olive oil (since it's also very fragrant and it would stick to their legs making it harder for them to climb onto the leaves of the plants).
Once I had my puree of peppers, I smelled it. WHOA. Talk about opening up those sinuses! My eyes watered a bit and my nose started running, lol.
I poured it into a bowl, and armed with a spoon set out to spread this concoction on and around my plants.
I put it around the stems where they met the earth, and around the perimeter of their row.
The results? EXCELLENT!!! The bugs immediately backed off and my arugula was able to grow uninhibited. I had a few bugs eating some cucumber plants also and spread some there and equally impressive results.
Pics will come soon!
So, this garden experimebnt was totally worth it as I used things (other than the olive oil) that I would normally have just thrown away or composted. I was also able to keep from using overly caustiic commercial pesticide on my garden, keeping with an organic method of growing, and being totally frugal all the while!
Pardon me while I pat myself on the back. :)
Wednesday, May 4, 2011
Make your own Greek Yogurt!!!
I'm a Fage freak. I LOVE the stuff. It's a total treat when I can find it on sale. But even on sale, about $3 for 2 cups is a steep price to pay for yogurt.
I've been making yogurt intermittently for about a year now. It's a surprisingly easy process and requires no special equipment.
You'll need:
A large pot with a lid
A thermometer (I use a meat thermometer)
A roaster oven or cooler
Large glass bowl or glass jars, app. 5 quarts
1 gallon milk, fat percentage is up to you
1 cup plain yogurt, as fresh as possible, fat content up to you
1 Tbsp sugar
Powdered milk, enough to make 4 quarts
Begin by pouring gallon of milk in pot over medium heat.

Whisk in powdered milk and sugar. Cover. My lid has holes for straining which were ideal for putting my thermometer in.

Allow to cook until temperature reaches 180. Took me about 40 minutes. Be sure not to cook over high heat. Check it occasionally to make sure the milk isn't scorching.

Allow milk mixture to cool to 100-110 degrees. Stir in yogurt. I used Aldi brand nonfat plain yogurt.

Pour into clean jars or bowl. Use glass. I used 5 quart jars.

Cover with plastic wrap.

Now you have to incubate the yogurt. I use a roaster over like this.

If you don't have one of these, most people use a cooler. Just be sure to have a warm place to leave it. Like the garage on a warm afternoon. The same steps for adding water would apply if you use a cooler.
I add hot water to the oven and set it at the lowest estimated temperature to keep the yogurt near 100 degrees.

Place jars in the oven or cooler with hot water.

Leave it. Forget it even. To make it tart it needs to sit for more than 12 hours. You should have yogurt after 3 hours but it will likely be watery. After 12 hours it will be substantially thicker. After 15 hours I have yogurt like this.
 It's hard to tell but it's solidified and the whey has risen to the top.
Now refrigerate the yogurt overnight. This is what my yogurt looks like now.

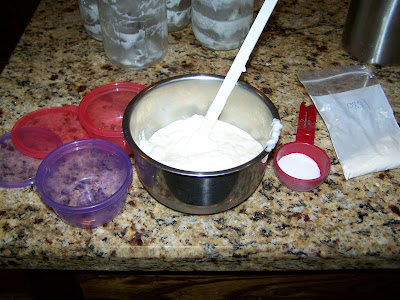
But I want Fage-like Greek yogurt. So I must strain it. So I construct this apparatus of a large bowl under a strainer.

Then I line it with paper towels. I have no cheese cloth. Wish I did.
Then I dump a jar of yogurt in.

I do the same with 3 of the remaining jars. 1 jar I save for Nathan, the other yogurt eater. He likes vanilla yogurt. I just happen to have vanilla powder from the local natural foods store. I add vanilla powder and sugar until he approves. Now we have home made vanilla yogurt!!

Back to the strained Greek yogurt.
When you strain yogurt you are removing the whey. I had this left from one jar:

My yogurt was this thick after straining for 1 day:

1 quart jar filled my saved "reused" Fage container.

The other 3 jars I let strain about 14 hours. That yogurt was a bit thicker:

So in summary, from 1 gallon of milk I yielded the following:
 The left containers are of whey. The middle containers are of the Greek yogurt. The right 2 containers are the vanilla yogurt.
Why save whey? It's extremely nutrient dense having a high percentage of calcium. Check out the nutrition facts for whey here. Here are some uses:
-proof yeast in bread recipes or use in place of milk or other liquids
-use as liquid in soups, stews, pasta, boiling potatoes
-use in smoothies, milkshakes
-use in salad dressings
So, is it worth it? Let's look at my cost out of pocket.
Milk: $1.59
pwdr milk: 4.24*
Sugar: n/a
Yogurt: .99
Total $6.82
Yield 10 cups
plus whey
10 cups of Fage? If on sale at $3 per container to get 10 cups worth I'd have to buy 5 containers. So it'd cost me at least $15, more than twice as much.
Time invested: 3 days :(
So, if you are interested enough to try it I think the cost savings is definitely worth it. I promise, you'll NEVER get yogurt that tastes this good in the store. It's as fresh as you can possibly get. And once you make some, just save a bit for your next batch and you don't need to buy any ever again. Plus, the total time spent actively "doing" something is nominal. Mostly it's just pouring from one container to another.
Let me know if you decide to try it and how it works out!!
I've been making yogurt intermittently for about a year now. It's a surprisingly easy process and requires no special equipment.
You'll need:
A large pot with a lid
A thermometer (I use a meat thermometer)
A roaster oven or cooler
Large glass bowl or glass jars, app. 5 quarts
1 gallon milk, fat percentage is up to you
1 cup plain yogurt, as fresh as possible, fat content up to you
1 Tbsp sugar
Powdered milk, enough to make 4 quarts
Begin by pouring gallon of milk in pot over medium heat.

Whisk in powdered milk and sugar. Cover. My lid has holes for straining which were ideal for putting my thermometer in.

Allow to cook until temperature reaches 180. Took me about 40 minutes. Be sure not to cook over high heat. Check it occasionally to make sure the milk isn't scorching.

Allow milk mixture to cool to 100-110 degrees. Stir in yogurt. I used Aldi brand nonfat plain yogurt.

Pour into clean jars or bowl. Use glass. I used 5 quart jars.

Cover with plastic wrap.

Now you have to incubate the yogurt. I use a roaster over like this.

If you don't have one of these, most people use a cooler. Just be sure to have a warm place to leave it. Like the garage on a warm afternoon. The same steps for adding water would apply if you use a cooler.
I add hot water to the oven and set it at the lowest estimated temperature to keep the yogurt near 100 degrees.

Place jars in the oven or cooler with hot water.

Leave it. Forget it even. To make it tart it needs to sit for more than 12 hours. You should have yogurt after 3 hours but it will likely be watery. After 12 hours it will be substantially thicker. After 15 hours I have yogurt like this.

Now refrigerate the yogurt overnight. This is what my yogurt looks like now.

But I want Fage-like Greek yogurt. So I must strain it. So I construct this apparatus of a large bowl under a strainer.

Then I line it with paper towels. I have no cheese cloth. Wish I did.
Then I dump a jar of yogurt in.

I do the same with 3 of the remaining jars. 1 jar I save for Nathan, the other yogurt eater. He likes vanilla yogurt. I just happen to have vanilla powder from the local natural foods store. I add vanilla powder and sugar until he approves. Now we have home made vanilla yogurt!!


Back to the strained Greek yogurt.
When you strain yogurt you are removing the whey. I had this left from one jar:

My yogurt was this thick after straining for 1 day:

1 quart jar filled my saved "reused" Fage container.

The other 3 jars I let strain about 14 hours. That yogurt was a bit thicker:

So in summary, from 1 gallon of milk I yielded the following:

Why save whey? It's extremely nutrient dense having a high percentage of calcium. Check out the nutrition facts for whey here. Here are some uses:
-proof yeast in bread recipes or use in place of milk or other liquids
-use as liquid in soups, stews, pasta, boiling potatoes
-use in smoothies, milkshakes
-use in salad dressings
So, is it worth it? Let's look at my cost out of pocket.
Milk: $1.59
pwdr milk: 4.24*
Sugar: n/a
Yogurt: .99
Total $6.82
Yield 10 cups
plus whey
10 cups of Fage? If on sale at $3 per container to get 10 cups worth I'd have to buy 5 containers. So it'd cost me at least $15, more than twice as much.
Time invested: 3 days :(
So, if you are interested enough to try it I think the cost savings is definitely worth it. I promise, you'll NEVER get yogurt that tastes this good in the store. It's as fresh as you can possibly get. And once you make some, just save a bit for your next batch and you don't need to buy any ever again. Plus, the total time spent actively "doing" something is nominal. Mostly it's just pouring from one container to another.
Let me know if you decide to try it and how it works out!!
Subscribe to:
Posts (Atom)